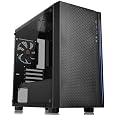
💼 Elevate your workspace with the Versa H18 — where compact meets cool.
The Thermaltake Versa H18 is a compact Micro ATX gaming case featuring a mesh front panel with integrated blue LED lighting, support for up to 280mm AIO coolers, and a full-length PSU cover for clean cable management. It offers multiple USB ports (1x USB 3.0, 2x USB 2.0), hidden drive bays for both 2.5” and 3.5” drives, and a sleek black tempered glass design, making it a perfect choice for professionals seeking a stylish yet functional PC build.


| Number of USB 2.0 Ports | 2 |
| Number of USB 3.0 Ports | 1 |
| Brand | Thermaltake |
| Series | Versa |
| Item model number | CA-1J4-00S1WN-01 |
| Item Weight | 10.21 pounds |
| Product Dimensions | 17.1 x 10.2 x 19.1 inches |
| Item Dimensions LxWxH | 17.1 x 10.2 x 19.1 inches |
| Color | Black |
| Manufacturer | Thermaltake USA Direct |
| ASIN | B079G3TNDM |
| Is Discontinued By Manufacturer | No |
| Date First Available | January 24, 2018 |
S**0
Solid budget case
First case came damaged but second one was perfect. Excellent budget case. Easy to build in.
N**R
nice clean case, good drive mounting and cable run options
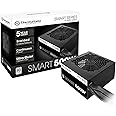
Just built a new PC in this case. No bling or excessive lights, just dark and quite. Very light weight and easy to work with. Buttons and LEDs discrete and inconspicuous. Both side panels remove with 2x thumb screws each, and fit well. Mounting the top rear cooling fan might be tricky depending on the motherboard, and I don't currently have anything mounted there. Might be some dust concern with the large vents in the top panel, but for me not an issue where I have the PC.Unusually, the power supply mounts at the bottom, with a separate dedicated intake and outflow for power supply air. This certainly helps with the heat flow, however the intake vent is on the bottom. They included a removable/easy to clean dust screen for it. I would put the tower on a hard surface or a stand instead of carpet to allow air flow to this bottom inlet. A flat piece of thin wood underneath would be sufficient. Also, there didn't seem to be a way to mount a front input fan, but this is likely not necessary. They took ventilation and dust filtering seriously.It has 3 mounts each for IDE style drives (DVD-RW for example), 3x smaller 2.5" drives, and 3x 3.5" drives. They have nice clippy trays, with plenty of airflow. One kind of weird thing is the SATA connections for the 2.5" drives are on the main side, but the 3.5" drives put the connections on the back. You could easily mount additional drives in the space between the "official" drive trays. They made a great wire run to keep a lot of cables tucked away out of the airflow. The CPU power, as well as the case front panel wiring can be run through here, and the channel has great access for all of the drive bays. Cleanest wiring imaginable. Took a few iterations to get as much of the wiring run through the channel as possible, but certainly worth it in the end.Best PC I ever built, and this was certainly the right case for it. (this was July 2020, pandemic/work from home project)-----Minor update 2023. The PC described above is still going strong. Processing data, developing software, designing spaceflight instruments, occasional games. The interior stays quite dust free, and the fans are nearly sub-audible. Easy access to the disks allows frequent cloning. Nearly 3 years in, and the case might as well be brand new.I just bought a second Thermaltake tower to build another PC for work. Kept the Silencer power supply, upgraded to a newer ASUS TUF Gaming motherboard and newer CPU. Added a GeForce RTX 3060 Ti, which takes up a lot of room but fits. Again, this tower was just a joy to build up. The interior is just so airy and open and accessible.One minor caveat, was this time the 9x motherboard mounting holes were not threaded. I cannot recall if they were threaded on my 1st Thermaltake tower, or if the bolts self-threaded more easily. This time, I couldn't get the motherboard bolts to thread into their holes. So I used a 6-32 tap to thread the mount holes, then the motherboard bolted in easily. Maybe the paint was a little thicker this time, or I should have pushed harder? Not a big deal for me, since I had a 6-32 tap on hand, and it took like 5 minutes, barely produced any filings.Other than that things went smoothly. It is also worth noting that the back of the CPU area on the motherboard is accessible thanks to a clever cut-out. This allows adding brackets for heavier CPU heat sinks, without having to remove the motherboard. Again, bravo.
M**.
I really like this case! But the metal is not the thickest.
Lots of drive bays and attractive with a basic black finish. I don't know how a full ATX board would fare but the ( Gigabyte) MATX motherboard I installed fit with minimum fuss. Everything is pretty sturdy when fully assembled and I like this case BUT the metal is very thin and you need to be extra careful not to strip any threads when installing the right screws, especially those that secure the various cards (like the video card). Look closely at screws and be sure you use the right ones in the right spots.
T**W
Cooling Mod for Versa H18
Love this case (but not at first) Delivered with damage to the bottom by the PSU which I had to bend and lightly hammer back before my PSU would fit like its supposed to (now looks factory with out a scratch) So I then installed my new system: Ryzen 7 3700X w/stock prism cooler, Gigabyte Aorus Pro B550m, Gskill Ripjaw V 3600 ddr4, 500gb M.2, MSI 1660 Super Gaming X, Apex 750w Gold+ fully modular, 2tb WD usb external for storage, 3 front 57cfm fans (intake) and 1 80cfm rear fan(exhaust) Now for the testing- running CPU at performance boost overclocked and ram from 16 19 19 19 38 to 15 18 18 18 37. System ran like a CHAMP, CPU would from 3.6g to 4.4g with out blinking, CPU temp 35c at idle and GPU 45c at idle (All Good) After some bench marks and stress tests I ran some games ( I'm a Hard Core Gamer LOL) This is when things got Hot- CPU would run around 65c to 74c gaming and the GPU ran around 69c to 75c gaming (I didn't like that) So I added another 80cfm fan to the top of the case for another exhaust fan and dropped my CPU Core Volt to 1.25v from the stock 1.4v setting (things got better) CPU was running at 52c gaming but my GPU was still hovering at 70c gaming, I then set a 120mm 80cfm fan on the shelf ( Where my Rat Fink Is) right next to my GPU, ran again and the GPU got even hotter (WTF) So I noticed how close my GPU was to the shelf/box above the PSU (like 1 inch) Seemed like my GPU couldn't breath (THIS IS WHERE MY COOLING MOD COMES IN) I disassembled the whole system and was going to cut some air vents/slits under the GPU so it could draw more air. Upon examining the case further I decided to just cut a 3x8 hole instead of slits under the GPU. Installed everything back into the case and tested. OMG what a deference, CPU ran at 32c idle and 45c gaming, and what's really amazing is my GPU ran at 42c at idle and 49c gaming, OMG WHAT A DIFFERANCE THAT WHOLE MADE!!! My GPU isn't on a ventilator anymore LOL. And you don't have to buy a different cooler (Unless you have money to spend for no reason) the Wrath Prism cooler is a BEAST on auto settings and I'm really glad because I didn't want a HUGE COOLER covering my mother board and the RGB on the Prism is really nice (And Air cooling is better then water cooling!!!) I hope this helps anyone with you're GPU running hotter than you want. I ABSOLUTLY LOVE THIS SETUP AND CASE. Maybe Thermaltake could make this case with air vents/slits below the GPU for better air flow? ENJOY AND GAME ON!!!!!
Trustpilot
1 month ago
1 day ago